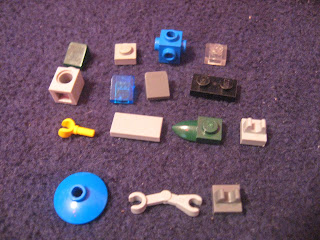
Unfortunately, our collection did not have the necessary white pieces to accurately complete this. So instead, I built a multi-colored model, solely for the purpose of a tutorial on building this.
 |
| Not near as cool looking. |
- 3 white 1x1 slopes
- 1 white 1x1 plate
- 1 black 1x1 brick with four side studs
- 1 clear transparent 1x1 plate
- 1 white 1x1 technic brick
- 1 white 1x2 tile
- 1 black 1x2 plate
- 1 white minifigure hand
- 1 white 1x1 tile with vertical clip
- 2 white tooth plates (Please note that only one is shown above. We only own two tooth plates and one was missing.)
- 1 small radar dish
- 1 bent droid arm
- 1 1x1 tile with vertical clip
Attach one of the side studs in the brick with side studs to the hole in the technic brick.
Place the 1x2 tile on top of the technic brick with half sticking out as shown.
Now add the clear 1x1 plate and the white 1x1 plate to the bottom of the tile.
Next, place the black 1x2 plate on the bottom like so.
Place one of the 1x1 slants on the plate. Attach the tile with vertical clip to the top of the brick with side studs.
Add the two tooth plates to the side studs. This next part is a little tricky: Attach the minifigure hand to the clip as shown below.
Now add the remaining two 1x1 slants to the tooth plates.
Now, if you want to build the base, here's how to make it and attach it.
Add the vertical clip tile to the radar dish.
This part took me several tries. You need to attach the bent droid arm to the vertical clip like shown in the picture below.
Attaching the base to the ship can be tricky too. You need to attach the clip on the bottom edges of the plate and technic brick.
There is your Space shuttle tutorial. Hope you enjoyed!


No comments:
Post a Comment